Saturday, March 31, 2012

Sweet Potato Green Lentil Soup

It may be spring, but it's definitely still soup weather here. It was rainy and cold all day yesterday and a hearty soup was in order to warm-up. I am one of those people who really looks forward to a cloudy, rainy, pajama day at home. Lots of slow-down time and snuggle with a book or baby time. And most of all, making a big pot of hearty soup will have you smelling goodness all day long- plus it is the best lunch and dinner without much dishes or cleanup. Yes, yes, I love rainy soup days with the promise of summer just around the corner.
I made this hearty lentil soup with a big heap of fresh green kale and some sweet and savory sweet potatoes. This soup has a nice variety of spices that will warm and heal the gut. Turmeric and ginger are a nice pair, not to mention a sweet and tangy broth to sip and slurp slowly all the way in. Which is a good reminder to eat slowly and not try and gulp down a meal in minutes. Take your time. Slow it down. Count your bites. And, even slurp a little.  
The lentils are the main protein base, but yet not overwhelmingly thick. And the colors are just gorgeous. It is a nice hue of green, yellow and orange, which seems to mirror the greens and yellows showing up on the branches and lawns outside. It seems almost like a neon green/yellow on many of the trees in my backyard. God really knew how to use nature's colors to wake us up to His creativity.
Sweet Potato Lentil Soup Recipe
2 TB of saute oil (coconut, ghee or olive)
1 large sweet yellow onion diced
4-5 garlic cloves minced
1 heaping cup of celery diced
between 1-2 cups of slivered carrots
2 sweet potatoes diced into chunks (about 2-3 cups)
2 ts. of ground turmeric
1/2-1 ts. of ground mustard seed
1/2-1 ts. of celery seed
1 ts. of ground ginger
2 heaping cups of finely chopped lactino kale
1 TB of freshly chopped sage (sub 1 ts. of dried)
1 TB of freshly chopped oregano (sub 1 ts. of dried)
1/2-1 ts. of sea salt
1/2- 1 ts. of ground black pepper
2 cups of soaked and rinsed dry green lentils
6 cups of vegetable broth
6 cups of pure water

optional:
chopped organic sausage
shredded organic chicken chunks

In a large dutch oven or 8.5 quart pot, saute the onions garlic and celery in about 2 TB of oil. Let it saute for a few minutes until tender and then add in the carrots and sweet potatoes and kale. Let those cook for just a few minutes and then add the water, broth and soaked/washed lentils. Stir well and then you can add the rest of the spices and herbs. Bring to a boil and let simmer and the lentils cook and soak up 1/3 of the broth. Depending on if I have more broth to spare or want a more soupy soup I may add more broth after the lentils cook and I see how thick the soup is at that point. I have also made this soup by adding already cooked lentils and less broth by 3-4 cups. Cook for about 50 minutes and let cool for 15-20 minutes before serving. It is a perfect hearty soup meal with no other need of add in's. A heart GF roll or croutons might be a nice touch, or if you like meat adding some organic chicken sausage or meat might make it even more hearty and full of protein. Serve warm and serves about 12 people, or is a great leftover soup for lunches and dinners. 
I also love to make a big batch of soup on the weekend because it is such a simple way to stay fed and nourished when you have a busy (or relaxing) weekend ahead of you. I am a big soup and stew fan most any day of the week, but it is especially nice to not have to be slaving away in the kitchen over the weekends.

Hope you have a special weekend planned with lots of good food and love!

Much love and light to you!

Wednesday, March 28, 2012

Spring Detox Iced Tea

This time of year the allergies [itchy eyes, sneezing, along with headaches and stomach issues] become sometimes unbearable. Especially this year because of the warmer winter and early spring with buds bursting and pollen levels super high all at once. I am no expert of seasonal allergies, and to be honest I never really noticed a problem with them until I was an adult. But, there are some things I have learned since becoming more aware of what I put in my body. Everything is connected, so why not use food as medicine and do what you can naturally.

So because the environmental allergens are super high, try and reduce the allergens you eat on your plate. This means sticking close to a plant-based diet and avoiding things like dairy, soy, tree nuts, and peanuts. Eat more seeds, greens and lots of water. Not only does this kind of diet benefit your spring-clean cleanse of your digestive system, but it will also help you clean out the build-up of extra mucus and inflammation.
And then there is this spring clean iced tea drink that I like to drinks lots of this time of year. The greens in the tea are nettles and dandelion. And then sweetened with local raw honey. So the mix is super simple and doesn't really deserve a "recipe" as much as it should be called "my suggestions". Nettles are amazing for your health. They contain lots of minerals, vitamins and chlorophyll. They stimulate a healthy liver, gallbladder and kidneys. They have as much calcium as dairy and they have shown to help men and women have healthier hormone levels. The list goes on and on, but they have been said to help with allergies especially this time of year as well. Dandelion is most of the time considered a weed, but it is a plant that produces leaves, roots and flowers that can be digested and have many health benefits as well. It is helpful to balancing the liver and cleaning our toxins from the body.  Peppermint is good for just about everything but known for it's gentlness and kindness on the stomach, nerves and also adds an overal wonderful calming flavor. Local raw honey is great for seasonal allergies because it contains your local pollen particles that if you ingest in small amounts will actually deliver immunity to the pollens. So for best results to taking honey for allergies you must find local honey, at least 100 miles of where you live. Raw local honey has so many health benefits as well. I think it is especially important to not cook or bake with the honey to receive the best benefits and also because of the body trying to get rid of mucus build up in the spring it is best to use raw honey more generously in the springtime as well.
Spring Detox Iced Tea Recipe Instructions
2 TB of dehydrated nettle leaves for tea
2 TB of dandelion green leaves for tea
2 TB of dried peppermint leaves for tea
8 cups of boiling water
2 quart sized ball/mason jar

OPTIONAL: 2 TB of raw local honey


In a french press coffee/tea pot, pour in the leaves and then fill to the top with boiling water so you will get 8 cups [2 quarts] of tea. Let sit and steep for a few hours, until the water is cool. Then pour strain the tea into a 2-quart-sized mason jar and if wanted sweetness, pour in 2 TB of raw local honey. Put on the lid and shake up vigorously for a few seconds, then put in the fridge and let it get cold. Drink whenever it is cold enough to your liking. But I suggest you shake it up before drinking to get that fizzy and bubbly iced tea affect. Then drink from the jar or pour into a fancy glass. Serve with a squeeze of fresh lemon if you desire. It is the perfect spring tea tonic if you ask me. I wouldn't be sharing it with you if I didn't think so.
I find my dried peppermint, nettles and dandelion as local herb shops. Some of my favorite local shops...Global Infusion and Harvest Health. But you can also buy these herbs online in larger amounts. If you are wondering where you might be able to find local honey to where you live I would check out your local farmer's market, or health food store. And if you don't have either of those then here is a local harvest website that might help you out as well.
Well, there you have my beverage of choice this time of year. I hope you are having a bright and sunny spring thus far and looking forward to the month of April right around the corner.

Enjoy and much love!

Monday, March 26, 2012

Greens & Herb Nut-Free Pesto (vegan)

Well, we all knew it would happen. The early spring tempts are back to normal here. No more air conditioning in March. And, sadly there is going to be a freeze tonight in most of the general area. So we'll see how the fruit tree blossoms hold up. Michigan makes 100's of millions of dollars growing fruit and it would be so sad to see so much of the harvest lost. I don't know that much about growing fruit trees, but I know farming in general demands a lot of faith and patience. I'm only a second year gardener so I have lots to learn, but I do know so much of the process just asks for you to be on your knees hoping for the best. I am getting so excited for plating our urban garden this year. We are doubling our space and hoping to plant so much more. Oooooo the impending excitement of the garden is half the fun...
Also, I was surprised to see some of my herbs from last year pop up in the last few weeks. I'm not sure if they just never died in the light not-so-cold winter, or if they are perennials [see...gardening is a never-ending learning experience!]. Well, I know my sage and oregano are perennials, but my parsley and kale popped up again too. So this pesto is made from the fresh herbs in my own yard as a hearty-happy welcome to spring and fresh food from the ground. Just look how green that pesto is! So wonderful and fabulous in every way. And, I made this pesto nut-free and dairy-free too for the allergen-free soul like me. This recipe is a little soupy-er than the average pesto, but the added seeds and oats really help cream up the mixture and make it worth drizzling over fresh, warm gluten-free pasta. If you add the nutritional yeast then you will not miss the parmasean too much as well. I think this sauce is the best with warmed freshly cooked pasta, but you could also try it as a dip for GF bread or crackers, salad dressing or whatever else you would like to make super green!
Greens and Herb Nut-Free Pesto Sauce Recipe
2 cups of mixed fresh greens: Kale, Spinach, Chard
(or add some Dandelion or Nettles for extra goodness!)
1 cup of mixed fresh herbs: Parsley, Oregano, Sage, Cilantro, Basil
1/2 cup of extra virgin olive oil
1/2 cup of pure water
juice from 1 fresh lemon
2-3 grated garlic cloves (or 2 ts. dried garlic powder)
3 TB of gluten-free rolled oats
3 TB of raw sunflower seeds
1 TB of maple syrup (optional for sweetness)
1 TB of nutritional yeast (optional as a cheese sub)
1 ts. of sea salt
1/2 ts. of cracked black pepper

Put all of the above ingredients in a high powered blender or food processor. If you are worried your blender won't blend the oats, seeds and garlic super fine, then place those as the bottom of the blender and pour the oil and water over them with the greens and herbs washed and chopped on top. Blend well together until you get a thick and creamy pesto sauce mixture. 


This sauce is meant to stay raw and drizzle over hot gluten-free pasta (tinkyada brown rice is my favorite). But this sauce can be used however you may use a traditional pesto sauce. 


If you do not love the taste of extra virgin olive oil you can sub some or all of the oil for grapeseed oil. If you can tolerate and like nuts then don't add the sunflower seeds and oats and just add a 1/3 cup of pine nuts or walnuts to do the job.


Use generously over pasta and keep the remains in a glass, air-tight container in the fridge to use again. You should get about 2 cups of pesto sauce from this recipe. 
Bitter greens and fresh herbs are perfect this time of year to help detox and purify your blood. If you are over-concerned about the oils of the pesto than you can remember that pure good-fats are also important to the process of detoxing and building up a healthy body too. Here is a great post on Whole Life Nutrition's blog about spring greens and all that they do to help clean up your liver and gallbladder. Who wouldn't benefit from more greens in their life?!
Hope you are enjoying all the green this spring and finding new ways to stimulate and clean out your digestion. It is so worth it to have a body that is detoxing naturally and running smoothly.

Hope you find lots of green and light in your life today!

Much love to you!

Saturday, March 24, 2012

Whole Grain Lemon Poppyseed Pancakes (vegan)

Spring-time always brings a basket-full of busy-ness. Besides the buds bursting, seeds being planted, and all the spring cleaning, there is the constant yearning to be outdoors. And this year because of the unseasonable warm weather there are bees, mosquitoes and a taste of July in the middle of March. I can't complain, but it does feel a little weird to have such warm weather so early in Michigan. Surreal almost 90 degree weather, tempted to be in the air conditioning and yet there are no leaves on the trees, only buds? Just plain strange if you ask me!

Basically, this past week was a story of weird occurrences for me. To name a few there was a smelly dead squirrel in the chimney, a dog-bite while running and then the record setting "heat-wave" in March. Just was one of those weeks where I had to stop and ask myself if this was real and I wasn't dreaming. Needless to say, I was looking forward to the weekend before humpday even started. 
Well because life does move on (and fast I might add) the weekend finally came and we were more than ready for it. So, it was about time for a special, slow-down morning with a special breakfast with the whole family. Today I decided on something perfect for a spring day. Something with fresh and sunny lemons along with a touch of poppyseeds. A classic combo with lots of love.
I made these pancakes without eggs, and they turned out fabulous and fluffy! I couldn't believe it. I was fully ready to add eggs half-way through making them because I thought they wouldn't turn out, but it happens that buckwheat and oats make a perfect combo for a gluten-free and vegan pancake without starches or gums or anything extra. Not to mention...with the addition to some fresh or frozen berries and a drizzle of local maple syrup... pure heavenly bliss!
Whole Grain Lemon Poppy Seed Pancake Recipe (gluten, dairy, egg, nut, sugar-free and vegan) 
1 cup of buckwheat groats
1 cup of gluten-free rolled oats

*Grind each grain, separately in magic bullet or high powered blender 
to make a heaping cup of flour- about 1 1/4 cup of each flour*

2 TB of aluminum-free baking powder
2 TB of chia seed meal
1 TB of poppy seeds
2 TB of grape seed oil or light olive oil
3 TB of maple syrup or coconut palm sugar
1 ts. of pure vanilla extract or 12 drops of liquid vanilla stevia extract
2 1/4 cup of non-dairy milk (So Delicious coconut milk beverage makes the BEST!)
1/2 cup of fresh lemon juice from about 3 lemons
zest from one lemon (about 1 TB)

optional additions or toppings:
fresh or frozen blueberries
fresh or frozen strawberries
goji berries
local maple syrup
raw and local honey
Pancake Instructions:
*First, grind your buckwheat groats and oats separately so that you have your flour for the pancakes. Then, mix the flours and all of the dry ingredients together in a large bowl. Then add the wet and whisk well together. You know your batter is doing well when you start to see the batter-bubbles appear and the batter thickens. This batter is pretty thick to make a fluffy and thick pancake, but if you like thinner pancakes add a touch more milk to the batter until it is less gooey and more milky.  


*Then, warm either your skillet or griddle and use some coconut oil or ghee to grease up the frying area. Then use a 1/4 or 1/3 measuring cup to pour batter over the hot skillet to make a good sized pancake. 


*Let cook for about 2 minutes and you will see bubbles on the top and then you know to turn to the other side. Cook for an additional 1-2 minutes. Make sure you keep the heat on low to medium so avoid burning! This recipe makes 1-2 dozen cakes depending on how large you make them.
I like to make my pancakes more rustic looking and not too perfectly round. I also like to slather a touch of vegan butter and a drizzle of local maple syrup. A heaping handful of fresh or frozen berries is the best topper if you ask me, but if you ask my husband he prefers chopped apples or apple butter.
For these pancakes to get the lemony taste best you want to add the fresh lemon juice and lemon zest, but you could easily swap out that flavor for another...just make sure you replace the juice with a comparable liquid. Peaches would be yummy or really any fresh fruit that you can find in season.
These pancakes hit the spot this Saturday and are a great treat for any spring weekend. I hope you find yourself slowing down this weekend and enjoying life for all it's gifts. Especially rest and pancakes!

Much love and light to you!

Saturday, March 17, 2012

Peppermint Pattie Cookies

I dunno about you, but I am going to celebrate with some mouth-melting peppermint patty cookies. It's no green beer, or corn-beef and cabbage, but really, does anyone really love that stuff anyways? Patty full of fresh and minty peppermint will just add to the fresh spring air coming through your newly opened windows. And for some reason I just feel like the peppermint patty is the perfect treat for a day like today.
This cookie was inspired by some homemade peppermint pattie recipes that I have been wanting to try, but I wanted to make my patty with a cookie and a little crunch. So I guess they could be considered a close cousin to the scout's thin mints, but because I never was a scout or ever really ate any scout cookies, I decided to call this cookie what it is to me, a peppermint....patty....cookie. 

Plus these babies are made with some pretty simple ingredients with lots of health benefits. If you are looking for a way to add more love to your life with raw honey and coconut oil, you may just need to make this recipe today! Raw honey is a great food to eat in the spring to help clear your sinuses and mucus glands. But you must buy local raw honey to really reap the benefits for your own regions seasonal allergens. Here is a great resource about raw honey as well! And here is a great reason to try and add more pure organic coconut oil to your life as well. (See, I told you I could justify any healthy treat!) And you are gunna need it after you try one of these....you just can't stop after one!
Peppermint Pattie Cookie Recipe
{Gluten and Dairy-Free}

[there are 3 parts to this cookie and each part is listed below in order with instructions]

Chocolate cookie base:
1 cup of freshly ground buckwheat flour (or 1 cup GF flour blend of choice)
1/4 cup of cocoa powder
1/2 ts. of sea salt
4 TB of coconut palm sugar
4 TB of soft coconut oil
4 TB of non-dairy milk of choice

Grind almost 1 cup of buckwheat groats in a magic bullet or high powered blender to make fresh ground buckwheat flour. Mix one cup of flour with the rest of the above ingredients. Use a rubber spatula to mix well and it will start out crumbly like a pie crust and will turn into a cookie dough. Take Tb sized balls and roll them in the palm of your hand and then press down the little quarter-sized balls on a parchment papered baking sheet. This recipe will make between 2 1/2 to 3 dozen cookies depending on how large you roll your cookies. Bake cookies in a preheated 350 degree oven for 10 minutes and then let cool for at last one hour. Then make the following mint cream topping...
Honey mint cream:
1/2 cup of soft organic extra virgin coconut oil
1/3 cup of raw honey 

In a small bowl, whip up the raw honey and soft organic coconut oil until it turns into a creamy whipped substance. Add the peppermint flavoring or oil and continue to whip. Then put mix in the freezer for just a few minutes to stiffen up a little bit to a frosting like consistency. Then with the mix you can either pour into a zip lock bag to "frost" the cookies (you do this by pouring cream in bag and then cutting a 1 inch slit at the bottom corner to squeeze out cream over cookie), or use a flat knife to frost the cookies, whatever is easier for you. Top each cookie with a teaspoon sized portion of the cream and spread all over the top flat and thin. Then return the frosted cookies to the baking sheet and place in the freezer for the cream to harden on top of the cookie. Freeze at least one hour, but can up to 6-8 hours as well. Then get ready to coated them in melted chocolate. 
Chocolate coating:
1 1/2 cup of dairy-free chocolate chips (I used Enjoy Life)
1 ts. of organic extra virgin coconut oil

In a small glass bowl, melt 1 heaping cup of dairy-free chocolate chips with a ts. of coconut oil in the microwave for 30 seconds, then stir and melt again for another 30 seconds. Then after a minute of heat it should be easily stirred into a liquid form. Then add the peppermint oil and stir well. You can also melt your chocolate over boiling water if you prefer. When chocolate is liquid, you can drop each frozen mint topped cookie into the glass bowl and use a spoon or fork to fully cover the cookie with chocolate. Return the coated cookie to the parchment papered baking sheet. After you are done coating all of the cookies, you can use the remaining melted chocolate in the bowl to sprinkle over the cookies to add an extra touch of drizzled chocolate to the cookies. Then return the cookies to the freezer and let the chocolate coating harden for at least one hour before eating. Then after the coating is fully hardened you can keep the cookies in a container in the fridge or even leave in the freezer if you desire. This recipe will make about 2 1/2-3 dozen cookies depending on how large you make them and how many you sneak before you share with others :)
These cookies are really truly simple too. Just 3 steps, but not many ingredients and they could last a long time being chilled in the fridge. A definite new found love in our house. I will be making them again for an Easter treat and probably again for Christmas with a festive touch. You could easily impress your friends and family with a treat like this! The only problem may be that you will not want to share, and will want to hoard them all to yourself as long as you can. I am pretty sure that when it comes down to the last one my husband and I will be fighting to see who gets it. So perfect and yummy in every way!
Just look at that cookie! Melt-in-your-mouth perfection.

Well, whatever you do to celebrate this fun day of Irish and green cheer and I hope it involves getting outside in this seasonably warm weather. In my neck of the woods, we are five days into a week long warm-up of 70 and 80 degree tempts. It's just heavenly. Perfect for spring cleaning, outdoor naps, and babies to be born!

I hope you have a beautiful weekend with lots of fresh air and sunshine.

Much love to you!

Tuesday, March 13, 2012

Coconut Shamrock Shake (vegan)

This past week I had the stomach flu bug of some sort. Terrible in a word. It takes days to feel normal again and when you have celiac disease and plenty of other sensitivities it only adds to the misery. It was a good reminder to me though of how important our health is. How important food is for your body. How food is medicine. Even when you can't keep the dang stuff in your stomach to last through the hour. But, I guess being sick really reminded me of how our bodies are an amazing ecosystem. They contain so many systems all going on at the same time and to have them all run smoothly you really need to give it all you can. Lots of vitamins, rest, and lovin'. And this time of year our bodies are ready for some spring cleaning. Just like the yard, basement and house. Your body needs to do some cleaning and get out the gunk from the more sedentary months of winter. So as I try and recover from a bug in the gut I have been extra careful this week to digest foods that will bring more minerals, vitamins and life back to my ecosystem. 
This yummy green shake is a reminder of just that. The bitter greens and chlorophyll help clean your cells and bring more oxygen to your body. And that's just a jump start. They continue to help your bones, your blood and your whole being. 

Not to mention...It's a special time of year of green popping up everywhere. New growth and new life. Or it's possible you may be driving by the advertisements for a something-shamrock-green-something at the 'golden arches'. Something I remember from my younger years. Something you really only like to think about this time of year. And, if you are a mom trying to get your kids to eat more 'green' this may be a fun way to celebrate spring or st. patty's day. So make a REAL green milkshake at home with a tasty combo of fresh greens, mint and some creamy coconut deliciousness.
Homemade Coconut Shamrock Shake (vegan-style)
8-10 washed small kale leaves
1 heaping cup of washed spinach leaves
2 cups of unsweetened homemade canned pears
2 cups of pear juice from homemade canned pears
1 can of chilled coconut milk 
1 ts. of organic peppermint flavoring (or use fresh mint to your taste)
30-35 drops of liquid stevia extract (or use ground stevia powder to your taste)

Blend the above ingredients in a high power blender until your shake is smooth and creamy. Serve right away. Or if you prefer chill it up in the freezer, or even leave it to make a coconut green ice cream. This recipe makes enough for 4 people to have about a 8-10 ounce shake.

Some notes:
*If you do not have canned pears from last fall, then you can use 2 cups of frozen pears thawed just a bit. Then add juice/water till you get a smooth consistency. Of you can try using fresh pears as well, just eyeball the fresh to be between 2-3 cups and use water or juice to get the consistency you desire. 

*You can use fresh mint to your taste, but I liked using the flavoring as well because it really brings out the flavor. It is just peppermint oil with a little sunflower oil  as well. Super simple and it makes it taste so fresh as well.

*I used stevia to avoid sugars. But you could easy add honey or maple instead. Or soak 4-6 dates to add to the mix as well to sweeten it up. 

Well, that is something green I will be enjoying this March. I hope to see some fresh and local greens in the coming weeks and looking forward to planting my own soon. Here is another great GREEN juice recipe from a local friend and blogger that I just love. Hope you are finding new ways to add more green to your life and let the spring cleaning begin.

Much love and life to you today!

Tuesday, March 6, 2012

Date Sweetened Spice Donuts with Pear Butter

There's nothing fancy about these delicious donuts. Just pure goodness. There is no need for sugar to make them worth sinking your teeth into and they are still mouth-watering sweet and moist. I love when I can bake, eat, and love a donut without any side affects to a sugar-shock or an allergic reaction. Sometimes I do justify a treat if it is a special occasion. I will say sugar or a rich delicacy can be tried in those special moments, but the truth is I usually suffer in the aftershock. So is it worth it? Is eating sugar and dairy or whatever else ails you worth the treat in the long run? I usually decide it is in the thick of the moment, but then regret it later. Maybe you have found yourself in similar situations...
Well, these donuts are made as a beacon of hope in a sugar-filled world. They are made sugar, nut, gluten and dairy free, with the added touch of a fruity, spicy pear butter that will have you licking your lips and fingers and whatever else you can accidentally spill it on. They are a far fetch from a jelly-filled deep fried or traditional buttermilk donut, but trust me, you will forget all of those past indulgences once you try this delicious healthy treat that tastes good and won't make you feel awful either.
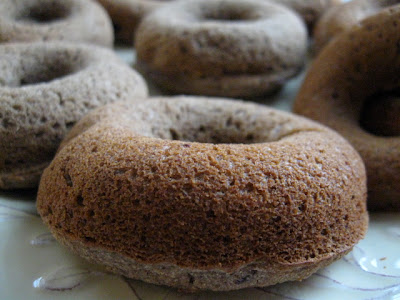
Date Sweetened Spice Donut Recipe (vegan)
1 cup of de-pitted dates
1 cup of pure water

Soak the dates in a blender, or bowl for at least 1 hour in 1 cup of water. You can soak for many hours as well, but you should at least soak for one hour to soften the dates. Then pour the date/water mix in a blender or magic bullet and blend until it is a liquified mixture that resembles pudding or a smoothie. 

1 cup of gluten-free flour blend (I used Bob Red Mill's gluten-free baking mix)
1/2 cup of coconut flour
1 1/2 ts. of baking powder
1 ts. of baking soda
1/2 ts. of sea salt
1 ts. of ground cardamon
1/2 ts. of ground cinnamon
1/4 cup of coconut palm sugar or sucanat
2 TB of melted coconut oil
1/4 cup of chia-egg-gel (2 TB ground chia seeds mixed with 4 TB of pure water)
*buttermilk mixture*
1 cup of So Delicious coconut milk beverage with fresh juice from 1 lemon (about 1-2 TB's of juice)

In a large bowl, mix all of the dry ingredients together first, then add the wet with the blended date mixture, "buttermilk" mixture and the rest of the wet ingredients. Mix well and then let sit for a few minutes for the batter to come together. Then use a rubber spatula to pour the batter in a gallon-sized zip lock bag. Make sure to get all of the air out and then press the bag shut and the batter to the bottom of the bag. Then use a kitchen scissors and cut a 1 inch slit off one of the bottom corners of the bag. Then in a non-stick donut baking pan, squeeze out the batter into the donut sized holes in the pan. Fill the batter tot he tops of the holes and then bake in a 350 degree oven for 22-25 minutes. This recipe will make 12 large donuts, or 24 smaller donuts. Pull donuts from the pan when they have cooled for at least 5 minutes, then continue to let the donuts cool on a cooling rack or plate.
You can top these donuts with whatever you like. But my favorite topping is homemade pear butter. You could also try a homemade apple butter or other fruit butter you prefer. You could also brush the baked donuts in a maple syrup glaze or an sun-butter-fruit glaze or coconut oil and cinnamon sugar glaze. Whatever fits your fancy, but the pear butter is my chosen love for this recipe because it soaks into the warm donuts and tastes like a warm fruit filled fritter that will leave you dreaming for more.
Spicy Pear Butter Recipe
2 gallons (8 quarts) of frozen pears (with or without peal)
Pears don't have to be exactly measured- You can use whatever you can get your hands on. Also, if you don't have frozen pears, fresh pears will work too. I do not think canned pears will work because of the excess moisture, but maybe some one out there can prove me different.

In a large 8-10 quart pot, dump your semi-defrosted frozen pears and basically you let them simmer down into a boil and you let them simmer on the stove for 6-10 hours until the pears have turned into a very thick sauce. You can add your spices after a few hours of cooking down and taste test to see if you want to add a touch more. Start smaller so that you don't over do it though.

start with these spices, and then add a pinch more if you want more spice:
1/2 ts. of allspice
1/2 ts. of ground nutmeg
1/2 ts. of ground cinnamon
1/2 ts. of cloves

Then, after the pears are cooked down, Let cool for 6-8 hours and then pour into a blender to whip into a nice thick and smooth butter. The butter should really look like a creamy butter...:)

Then if you want to preserve your butter you can follow traditional preserving methods and can it for a later date. I like canning the butter in pint-sized jars so that they are easy to get the butter out with a small knife or spoon. Perfect.

The 2 gallons of pears roughly made about 4 pints of butter. Just to get an idea of how much water is reduced.

Well, friends, there you have it. This recipe has become a new favorite in my house. The donuts are yummy from the oven, but will last 3-4 days in an airtight container in the fridge. We toast the leftover donuts in the toaster and they are toasted and warmed just enough to top with some pear butter and they are just as perfect as the minute you ate them warm from the oven. So a great leftover breakfast or snack - basically a great treat to have laying around when you have hungry kiddos asking for something in between meals.

This recipe could also be baked as a muffin recipe, or add another 1/2 cup of milk and make it a great pancake recipe. Maybe I will re-post this recipe as a pancake recipe soon. Dates are so delicious in baked goods and a perfect ingredient when trying to avoid the processed granulated sugar.

Hope you try this treat. It's worth buying a donut pan for because you will use it again ;)

Much love to you as always!

Saturday, March 3, 2012

Creamy Coconut Pineapple Fried Rice

I guess the saying is right about March 'coming in as a lion'. The wind has been howling here since yesterday and all through the night. The snow is just starting to fall this morning and it's been a yucky few days here in Grand Rapids. Yet, I am not complaining...nothing severe. I watched the national news this morning and my heart was aching for all of those families who lost everything in the last few days of fierce and unforgivable tornadoes. I have no words. So much destruction and so much loss. May God grant them peace and rest as the people involved in this natural disaster try to gather their bearings and loved ones.

Spring always seems to bring on season of fiesty-ness. You can see it in the changing weather and in the moods of people. It just seems that during the winter months life has fallen asleep, and then spring comes knocking on the door saying "WAKE UP!" Yes, official spring is still a few weeks away yet, but you may have noticed that turning the calendar into March starts the spring fever of counting days til warm weather, sunshine, seed planting and more. The earth is awakening and we are beckoned to take part.
This recipe is something I whipped up a few nights ago as I was scanning the fridge for a last minute supper idea. I recently bought a pineapple for some spring-time fruit cravings and it didn't hurt that it was also fresh and on-sale too. Pineapple is just getting into season in the southern hemisphere and if try it now you will know it is the best this time of year. I also just finished reading a novel based on the Hawaiian islands that started the craving for some fresh tropical fruit like pineapple. So it has been a treat to add it to pizza, smoothies, and now it inspired me to make a last minute veggie fried rice. Delish!
Creamy Coconut Pineapple Fried Rice recipe (vegan style)
1 heaping cup of chopped broccoli (fresh or blanched frozen) 
1 heaping cup of chopped red bell pepper
1 heaping cup of chopped carrot slices
1 cup of chopped celery
1-2 cups of chopped fresh pineapple
3-4 cloves of grated fresh garlic
1 TB of freshly grated ginger
1 TB of sauteing oil: coconut, ghee or grape seed
1 ts. of ground turmeric
dash to 1/2 ts. of sea salt
1/2 ts. of ground pepper (black or red)
2-3 cups of pre-cooked (leftover) short grain brown rice

optional additional toppings:
1/4 cup of shredded coconut pieces
1/4 cup of currants or raisins
1/2 cup of crushed cashew pieces
switch the rice for leftover quinoa
add fresh chopped green onions
add fresh or frozen green peas

If you need to cook some rice for this recipe, I suggest cooking it a few hours before you make this dish because you do not want your rice wet or soggy from cooking. You want it fluffy and dry and ready for use. This recipe calls for about 2-3 cups of brown rice so it is about the amount if 1 cup of dried rice before cooking. I used organic short-grain brown rice, but you could use a basmati variety or your favorite kind. 


Then in a large wok or frying pan/pot, saute the ground ginger and garlic in the oil. Then add the veggies and pineapple and pour in the tamari first to soak into the veggies. Then after a minute add in the coconut milk and curry paste and spices. Saute for 5-10 minutes to let the veggies cook in the liquid, softening them up and also creating a lot of great saucy flavor. Then when you veggies are soft, yet still have a touch of crunch stir in the rice and other toppings you prefer like coconut, cashews or currents. (If you are not vegan and want to add in an scrambled egg for more protein- then do that as the last step).
Serve hot with added fresh cilantro or thai basil and a sprinkle of nuts if you prefer.


This recipe will feed 4-6 people, or serves as a great pack-up lunch or dinner for on the go. 
This dish is a great way to have a plate-full of color and fiber. Lots of antioxidants, vitamins and nutrients in a variety of veggies and fruit. Plus the spices will warm and energize your digestion as well. You can add other veggies if you prefer and also think it would be easy to add quinoa instead of rice if you wanted to try that option. I love having a warm plate of veggies in a one-stop-pot meal. Lots of flavor and super easy to make as well. The pineapple is the star of this dish with so much amazing flavor of sweet and tangy. It is the perfect addition to any veggie stir fry in my opinion.
I hope you enjoy and have a warm weekend. Even if it is indulging in some yummy pineapple that makes you dream of places warmer than 20 degree temps and gusting-snowy wind. That's what I will be doing anyways :) Spring is just around the corner....knocking on the door...

Much love and light to you today!

Thursday, March 1, 2012

Red Lentil Gluten Contamination

A few weeks ago I made a large batch of some red lentil soup. Lots of goodness and lots of color. But as I ate a few spoonfuls I started having my usual (and horribly familiar) gluten-contamination reactions. Lots of tingling in my neck, numbness in my arms and legs and a weird foggy feeling in my head. My eyes start to itch in the corners of my eyes and after a few hours I have a very bloated and sick tummy. To say I was disappointed and flabbergasted was an understatement. I do so much to make sure my family and my food is gluten-free in my house and to be contaminated or poisoned in my own kitchen just makes me feel awful (and sick in more than one way!).

I did some thinking, researching and googling and came up with the conclusion that the red lentils I used and did not soak and rise like I usually do were crossed contaminated with some other gluten-grain. I went back to the bulk package of red lentils that I poured from to make my soup. I usually take the time to soak and rise the lentils, but on this particular day I was in a rush to make dinner and just trough the lentils in the pot and stirred. I regretted that very much when I had a nice pot of soup that had been gluten-fied after it was cooked. I donated the soup to some friends that can eat gluten and rested and waited a few days for the reaction to go away.

This experience was a reminder to me how sensitive my body is to gluten. I sometimes think that maybe it is just in my head and it's all a game. When I accidentally take in the gluten I am abruptly reminded that is not the case. I am in fact severely allergic and sensitive to the ugly gluten.

Whole Life Nutrition's Lentil Contamination video on Vimeo and recipe post about lentils.

Gluten-Free Life with Jen

Gluten-Free Musings

Above are some links that helped me understand the cross-contamination of the lentils. Red lentils ARE gluten-free, but many times they are mixed with other gluten-grains in the harvesting and packaging process. In the future I will be cleaning and soaking my lentil to make sure there is no other grains in the mix, and also if I can find them, plan on buying certified gluten-free, non-bulk red lentils. I love red lentils and will go the extra mile just to make sure I am getting a red lentil that will not make me sick and sad for a few days after accidentally eating. It's no fun. It is again a very clear reminder that healing from gluten doesn't always mean you will not accidentally have a gluten attack ever again. It sometimes happens and it sometimes even happens with the best intentions and efforts.

Has this ever happened to you? Any good/ bad news you would like to share with my findings? Please leave a comment below so we can all know more on the issue. Thanks!